


How to Install a Fireplace Mantel
Choosing the perfect fireplace mantel is only half the job. The other half is installing it around your firebox so you and your loved ones can enjoy it for years to come.
Before You Install: Parts and Tools
Lay out all your mantel parts and hardware to double check that nothing is missing. Shelves may include supporting corbels, while mantels with full surrounds will include legs and, if applicable, scribe molding. Hanger boards also are included with some mantels. If you plan to sand, prime or paint your mantel, do so.
Different Brick Anew mantels may require the following installation hardware:
- Nuts
- Bolts
- Flat washers
- Lock washers
- Screws
- Finishing nails
Suggested tools include:
- Level
- Power drill/screwdriver and bits
- Hammer
- Wrench
- Tape measure
Initial Assembly
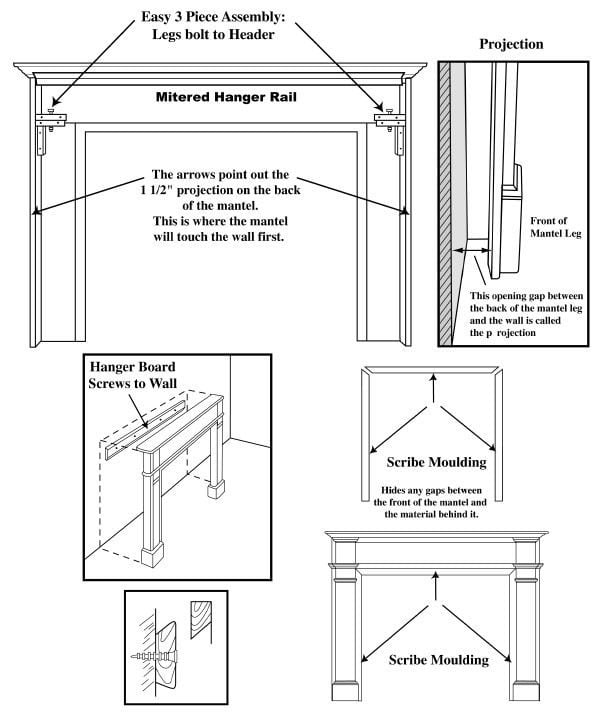
In most cases, the easiest way to assemble a mantel is to put the main shelf upside down on the floor. Then bolt on the corbels if included (for plain shelves) or legs (for full surrounds).
Measurement for Fireplace Mantel Height
Proper measurement ensures that your new mantel will look well balanced and fit safely around your firebox. We assume here that your mantel includes a set of hanger boards (one loose, one attached to the mantel) and that you’ll be using the set for your installation. Be sure to check your local building codes to ensure proper placement.
-
- 1. Pick up your loose hanger board. This is the one that attaches to your wall. Slide the thinner end of the board into the gap under the hanger board secured to the mantel. When you actually mount the mantel, these boards will form a single unit, with the secured board simply “hooking” over the loose one. Hold these two boards together with your hand.
-
- 2. If you’re installing a full surround mantel, measure from the bottom of your mantel’s right leg to the bottom of the wall hanger board. If you’re installing a shelf with corbels, measure from the bottom of the right corbel to the bottom of the hanger board. If your shelf has no corbels, measure from the bottom of the shelf to the bottom of the hanger board. Write the measurement down and repeat on the opposite side for accuracy.
-
- 3. If you’re installing a full surround mantel, starting from either your floor or hearth (where the legs will sit), measure up your wall on the right side of your firebox the distance you recorded in Step 2. Mark your wall. If you’re installing a mantel shelf, determine where you want the bottom of the shelf (or corbel, if applicable) to sit. Measure up the wall from the floor or hearth to this distance on the right side of the firebox. Continue up the wall the distance you measured in Step 2 and mark your wall. Repeat the procedure on the left side. Your marks indicate where the bottom of your loose hanger board will sit.
- 4. Use your level to make sure your marks from Step 3 will place the loose hanger board perfectly horizontal on your wall. If the hanger board is not level, the mantel won’t be straight when you hang it, so take the time to measure again if necessary.
Installation
-
- 1. Take your loose hanger board and hold it against your wall, lining the bottom up with your measurement marks.
-
- 2. Mark where the holes for the loose hanger board are on your wall. You may measure the widths of your firebox and the hanger board to find the exact centering point if desired, but since the mantel simply hangs on the hanger board, it’s possible to simply slide the mantel to the left or right to get it properly centered around your firebox.
-
- 3. Predrill mounting holes where you’ve made your marks in Step 2 if necessary.
-
- 4. Secure the mounting board to your wall.
-
- 5. Lift the mantel up over the hanger board on the wall. Lower it down until the hanger boards on the wall and mantel fit snugly into each other.
- 6. If applicable, place your scribe molding along the inside of the mantel legs and underneath the shelf. The molding should hide any gap there is between the front of your mantel and the material behind it.
Video: How to Install A Fireplace Mantel
“So what I’ve done here is I’ve measured. We’ve actually lined this up and got Carmen’s approval because it’s all about Carmen and John where they wanted this fireplace mantel. So we have our mark. This is going to be the top of the mantel. So the next step is to figure out where your mounting bracket is going to line up, and the simple way of doing that is you’re going to take this measurement here which is 2 ¼, and the reveal side of your mounting piece of wood here is 1 inch. So we’re looking at 3 ¼ inches down. It’s going to be where the bottom of your mounting board is going to line up. So we went ahead and make your mark 3 ¼ inches below. Now we’re going to put a level up here. Get my marking lines. And then we’re going to be ready to install our mounting piece.
So we have our level mark for the bottom of our mounting wood of piece here. Now you are going to notice that it is migered (sp?) The migered (sp?)—the point is going to be away from the wall so your wall is going to be resting on this side here. This is how these work. You’re going to place this. This is going to be mounted right here. We are line this up. Now I wouldn’t worry too much about getting as close. You can eyeball center on this because the mantel itself actually overlaps it by several inches on each side so you’re going to have room to slide it back and forth. You can actually place the mantel on here. So I’m going to pre-drill my holes, and then we’ll drill them out two holes, and then we’ll get this put up.
I’m going to pre-drill the 3/8 inch holes which are my counter sink anchors. I’m going to go ahead and use my level as a straight edge guide, not really paying attention to if it’s level or not. I’m just going to place it right against the edge of the fireplace here. The fireplace door. And now I’m going to go ahead to line up my level marks that I put up on the wall here, and this is going to be my guide. So there I go. I’m all nice and lined up. Ready to rock and roll here. And now I’m going ahead to pre-drill these holes. If you have someone to help you hold the wood. Carmen? It can help. Just make sure you don’t move it as you’re actually drilling the holes. Once again, we’re using the counter sinking bolts because we do not want this mantel being pulled down or falling off or anything.
Okay, we’ve lined up everything. We’ve taken—I’ve pre-drilled the holes in the wood and I’ve taken the wood. We held the wood up at our level marks in line with the fireplace. We went ahead and used our mason bit to drill into the block itself or the red brick or clay brick. So now we have our guide holes for our anchor brackets. It’s a home improvement project.
Don’t stop. Lift it up. And then slide it down on. Boom. Okay. So what you can do too with this is we want to take some counter sink finishing nails. Never. This is the bottom. We line up the center of the pit. So we now the fireplace is 30 inches. And now we’re dealing with 48 inches. So bring it in the center of this should fall right on the 5 inch mark. Okay, what you need is an 1 ½ inch on either end. So what we’ll do here, this is a 6 ½ so 3 ¼ mark. Stop, stop, stop, stop. It should be right on. That’s right. Bam. Done. Fireplace done. Perfect. Fine. There you go.”